Review: Muon Suite

On our first Linux Inside we not only explained the origin of and what package managers are, we made a very specific case: Linux, hand to hand with APT, was at least a decade ahead of the competition. Such a powerful advantage ought to be exploited.
Muon Suite is set of applications designed to deal with APT ranging from a user friendly, and incidentally less powerful, interfaces to advanced interfaces. If any reader is uncertain about what APT is, we recommend reading our previously mentioned: Linux Inside: Package Managers.
Muon Software Center

As can be seen in the previous screenshot Muon’s Software Center is incredibly straight forward, clutter free. Its default view shows all the main categories, after selecting what you want, it will show either the corresponding packages or subcategories.
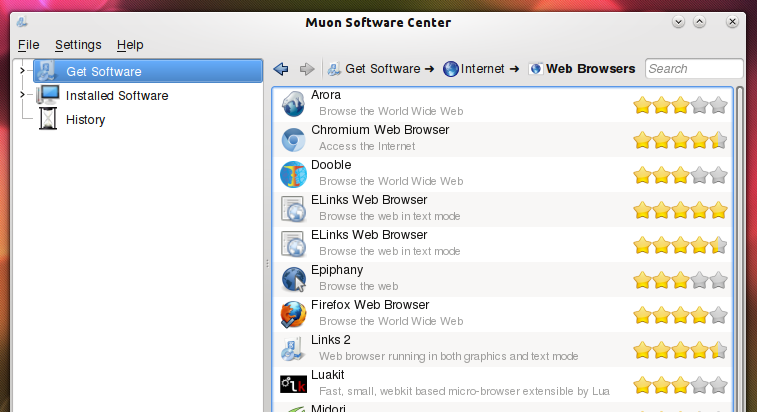
Searching is a breeze, you can start doing it by clicking on the field on top, Muon will search on apps’ descriptions as well as its names. One thing worth mentioning is that search is context sensitive, by this we merely mean it will search inside the category you’re currently in, users should keep this in mind since it can be a cause of confusion.

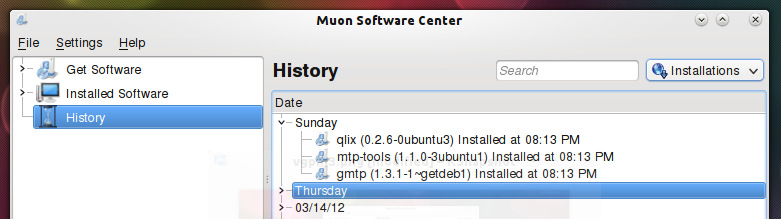
Clicking on Get Software will shot you a list of respositories, allowing you to sort out packages according to its source, by clicking on Install Software you will get a list of the currently installed packages, you can sort them out by source too. By clicking on History you get a convenient list of packages you’ve installed using APT sorted out by date, and you can filter your history by installations, updates or removals using the drop down menu on the upper right corner. This can be useful if some changes had negative effects, or if you removed something you wanted by accident and you can’t recall its name.
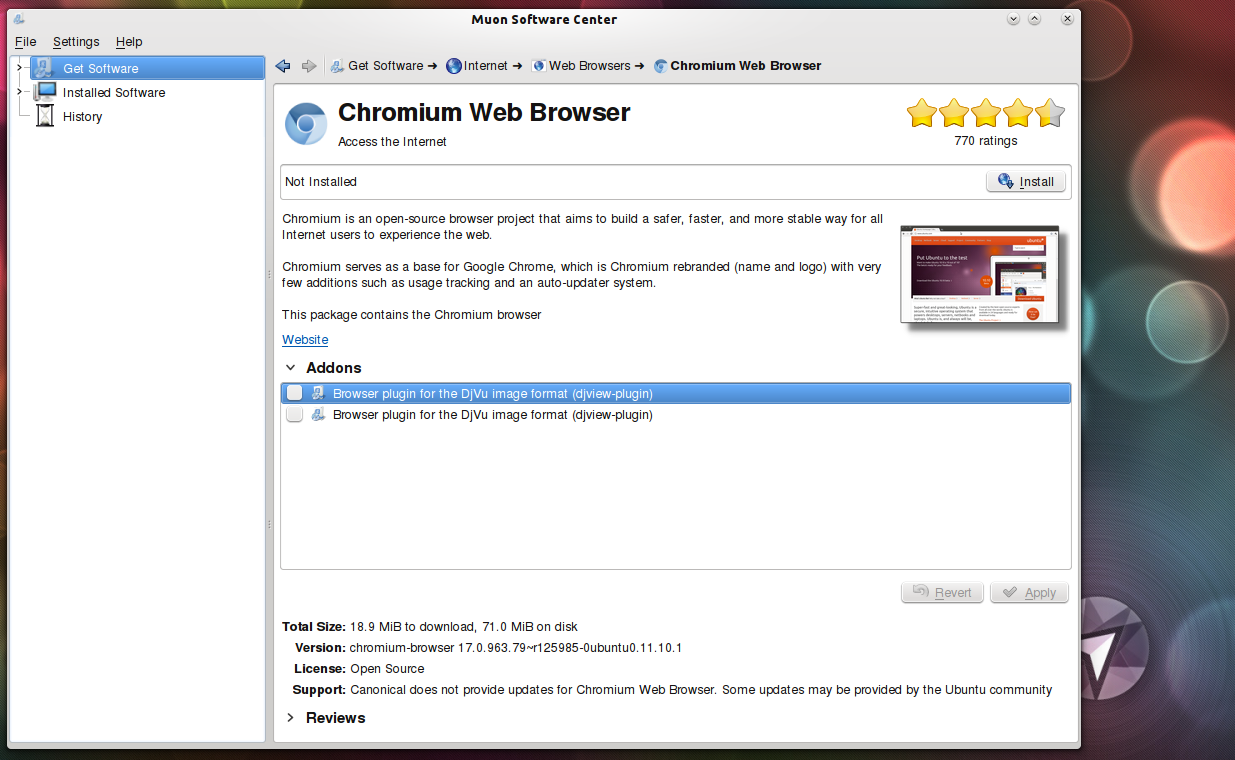
Clicking on any app gets you its description along its rating. If available, you also get its screenshot and addons. Addons are extra packages that are not dependencies but can further expand the feature set of apps, after selecting the desired ones, click apply. On the bottom you can find some technical information: The size of the download and the size once its installed, version, licence and whether Canonical offers official support or not. At the very bottom you can find reviews done by other users of Netrunner, Ubuntu itself, or other Ubuntu derivatives.
Under the menu File there are two relevant options: Read Markings, Save Markings. Markings are the changes you’ve selected, packages you’ve picked to install, remove, or update. Reading marking works as expected, saving them on the other it’s rather hard. If you click install on any app it will automatically start installing it (i.e. it doesn’t mark it, it goes straight into applying the change), it can more or less work if you’re offline (packages won’t install, and it will offer you to save your markings).
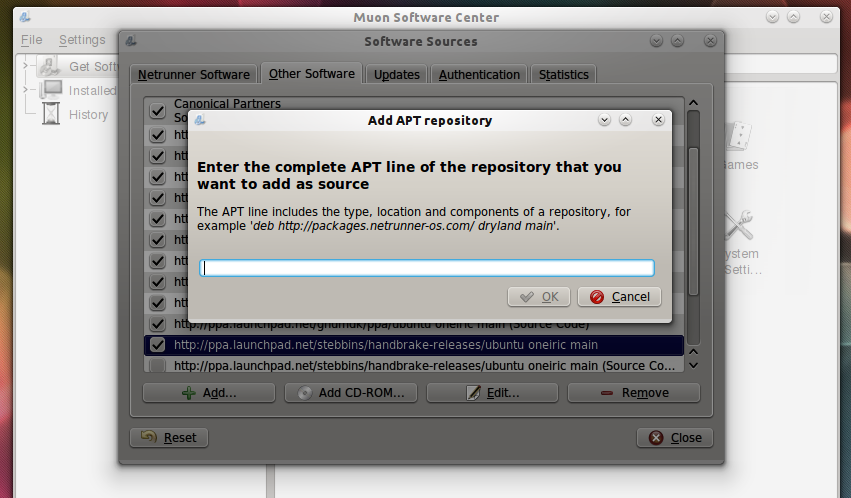
Under the menu settings is one of the most useful features of APT: Managing your repositories. Thankfully, this settings window is shared is almost identical among the front ends installed on Netrunner (in fact, its same on two of them, and except for a few cosmetic changes, it’s the same on the remaining one), meaning there’s a lot of consistency. The source list of repositories itself is always shared, regardless of the app, simply because all of them are just front ends.
The main tab reads Netrunner Software, and allows us to choose between main packages, unstable packages and source code, all self-explanatory. The second tab, labeled Other Software is where we can add more repositories, modify, remove or enable/disable the current ones. After clicking Add, it will prompt us with a little window asking for our APT line, this line is composed by deb/deb-src url-of-the-repository os-version section, for example, deb http://ppa.launchpad.net/stebbins/handbrake-releases/ubuntu oneiric main. Most of time you’ll find the APT line complete, so you don’t need to care about what it every bit means.
The third tab, Updates, let’s you set how often you want it to automatically check for updates and whether security updates should install without any confirmation or not, if you want packages to download automatically, or if you just want to be notified. You can also decide if you want to be informed if there’s a new version of Netrunner.
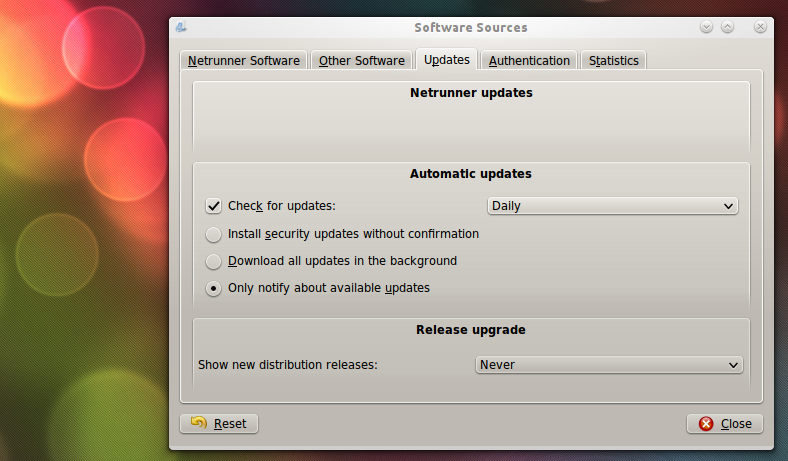
The fourth tab is a little bit more technical. It has a list of keys, these keys are used to authenticate the source of your packages, you can think of it as a way to recognize if the packages you’re downloading are being pushed by someone you trust. You can think about it the following way: If you pay with your credit card you will be asked to sign a receipt, then they will check if your signature matches the signature on your card, in this analogy you’re the one being paid, the card is the key, the money are the packages you expect to receive, and whoever is paying you is the owner (maintainer ) of the repository. Unless you add every repository key you will be warned every time you install unsigned packages, technically speaking, it isn’t secure, but practically speaking the chance of having any issue because of this is close to zero.
The fifth tab is almost completely empty, save for its only setting Submit Statistical Information, which will send reports about what is installed on your computer and how often is used, this helps developers take decision regarding their next release. All reports are anonymous.
Muon Package Manager

Is Muon Software Center’ big brother. Unlike it’s little brother, it has a lot more options and it shows all packages instead of just apps. On the left side it offers three different vertical tabs: Category, By Status and Origin. Two out of these three are analogous to what we already saw on the Software Center, the remaining one, By status, should be easy to grasp it allows to filter packages according to their current state: Installed, Not Installed, Upgradable, Broken, Residual Configuration, Installed (auto-removable) and Locked. Just by glancing at these filters it should be clear its aimed toward a more advanced set of users. Let’s see what each of this categories stand for, obviating the obvious ones:
- Broken: Packages missing dependencies.
- Residual configurations: Data left by packages that are no longer installed, removing them will not affect any currently installed application, and will merely free some hard drive space.
- Installed (auto-removable): Packages (specifically libraries) installed but no longer needed by any application on your system.
- Locked: Packages marked as locked can’t be automatically upgraded or removed.
Clicking on any package will expand a section showing several tabs (not always all of them), Details, Technical Details, Dependencies, Installed Files, Versions and Changes List. The first two, although presented differently are the same we saw earlier. The other are self-explanatory, Dependencies will show all dependencies of the current package (allowing us to compare dependencies between the currently installed version and the latest version, it will also let us see what packages are dependent of it), Installed Files will show all files installed by this package, Versions will shot all different version available on the repositories and Changes List will show the differences between versions (note: the changelog some times is not available, more often than not it isn’t because there were no changes, but rather because the list was not pushed, this mostly happens with packages outside the official repositories).
On the toolbar, preview changes will show us any package we’ve mark, apply changes will do just as it says, just as check for updates, undo, redo and unmark all will. Sadly, full upgrade, is not correctly labeled, and will definitively cause a lot of problems, usually, upgrade runs the following command apt-get upgrade, for no apparent reason Muon’s developers seem to think we should be changing our 12 years old terminology, and full upgrade instead runs apt-get dist-upgrade, users should avoid it unless they want to upgrade to the next release of Netrunner (otherwise they could break packages).
The toolbar is filled with options, most of them are the same as Software Center’s, under File the main difference is saving marking actually works as expected because changes are not applied automatically, but rather until you click apply changes. This feature can be pretty useful to commit the same changes on many machines without marking everything again. Also under File is the useful (but rather uncommon for regular users) option to use downloaded packages, this function basely transforms a set of packages we’ve downloaded (to a specific folder) into a local repository, so APT also checks for dependencies there.
Under Edit the only alien option is Cautious upgrade, ironically, this entry that seems to spread cowardliness is what most users should be running, since it runs the usual, and often desired, sudo apt-get upgrade. Under View we can see History, under Settings we are presented with Software Sources and Configure Muon Package Manager, as we’ve already commented Software Sources is shared so we already know how it looks like. Configuring Muon Package Manager is very simple
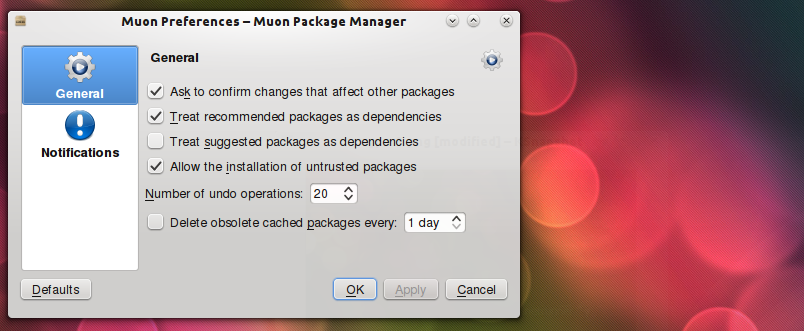
To understand what everything means we just need to know the difference between recommended packages and suggested packages.
- Package Y is said to be recommended for X, if the the maintainer of X claims that most users wouldn’t want X without Y.
- Package Y is said to be suggested for X, if the package Y enhances the functionality of X.
Is time to make changes. To do so, we can either click on the buttons that appear under the tab details, which offers a drop down menu with the most common options, or by right clicking, the later is more efficient, and it shows more options, one of them is new: purge. This will simply remove packages alongside their configuration files (effectively, it is like removing it and then removing its residual configuration). After deciding what you want, just click Apply and let APT handle the rest.
Muon Update Manager
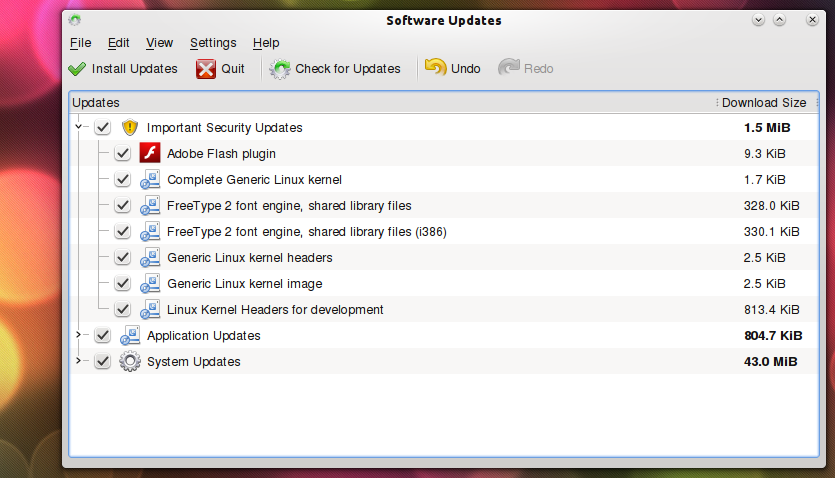
Now that we’ve install everything we wanted, we surely want our system to keep up to date, here’s where Muon Update Manager comes into play. Instead of having to manually check for updates it Muon will manage everything for us, it will periodically check for updates and will offer you to install them, you can even setup it, as we previously revised, so it installs them automatically without your personal intervention. Thanks to APT’s centralized nature, you won’t be only receiving updates for your default set of apps, as it happens on Mac OS X or Windows 7, but to every single app installed using APT.
Its interface is both clean and simple. It sorts out updates according to their nature, and lets you know how big of a download updates are, you can easily pick what to and what not to update with one click. Also, thankfully, Muon Update Manager behaviors as usual, this means that behind the curtains it’s running apt-get upgrade (or a subset of this packages).
Could Netrunner and APT get any more easier than this? It could surely improve in some areas (as any piece of software could), but it seems that Linux has all bases covered: An easy, fast and secure way to keep your system update, to install new applications on your system, and if you’re a more advanced user, an easy way to setup and pick libraries as you wish. This should help users realize that giving choice to people is not a bad design decision as long as you find a way to make every user find the tool best suited for them, Netrunner, I think, manages to accomplish precisely this with its selection of APT front ends.
[…] APT’s impressive features captured your attention, you may want to read our article Visual Guide: Muon, where we show how to use them more effectively, our upcoming Linux Inside: Mastering APT, where […]
since gnome 3 and unity came on stage, i left linux for xp, but now after reading a lot of good reviews about KDE i decided to give it a try.
i wanted to try a .deb file kde distro so kubuntu was an obvious choice, but i hate kubuntu (a real poor kde implementation), so i went for linux mint 12 kde.
a pure crap ( and believe me this is a compliment), then i heart about Netrunner.
i went to the website and read a lot about your distro and read a couple reviews on internet. good ones.
then i so the screenshots of Dryland 4.1 on the website.
well guys if you think that is a beautiful and clean interface, you are in the wrong direction.
the simple start menu lacking the search feature is not a modern and useful feature. and what are the terminal and a couple of web apps doing in the panel? lets not even talk about the right side of the panel. the syst setting, the sinaps package manager and the show desktop icon buried somewhere there, just add confusion to the mess it is.
being windows-ish is not a good thing either. but the biggest offense to everyone is what u guys have done to that great peace of open source software : Firefox, by
tweaking its beautiful and modern interface to that of an obsolete and ugly internet explorer 7. really unacceptable !!!
with a bitter taste in my mouth i was preparing to leave your website, but than i decided to take a look at the experimental netrunner mag link and i read a couple of articles on how to tweak netrunner plasma desktop.
and the screenshots that i saw there just blew my mind. beautiful and clean interface, wonderful wallpapers, clean bottom panel with the right size and no extra ugly stuff in it, nice themes.
thats the way netrunner interface should look by default, simple, clean, minimalist and with the KDE flavor (after all its a linux and not a windows OS).
so at the end i see that u guys have a lot of potentials, but u should focus your efforts on the right direction which is stop pretending u are windows in first place. than polishing the distro, using a clean not messy interface, crisp fonts and put a lot of efforts in making it a solid and stable distro (pardus 2011 is a good example).
wish u all the best and i will come back when the new release will come out hoping that i will see a true kde distro at last.
I can see the point of making Netrunner interface Windows-like (including Firefox). But I must admit that deleting the Netrunner’s GUI configs to KDE’s default was a first thing to do.
Except that I love Netrunner’s selection of packages :-) All is there!
i also like the selection of packages too. great. everything you imagine is there.
but still i can not swallow the look and feel.
dolphin’s visual layout not good.
the default fonts set up at 11 !!!! too bigggg.
these guys have potential. the distro is rock solid ( no crashes at all for me) but it lacks a lot in visual appealing.
focus on that please. if u want to stay out of the crowd u can even include smth special like the oxygen transparent theme in your theme selection too.
nobody is gone select netrunner for the windows look. we have had enough of it.
we want smth special and different.
Hello Edshyti,
I understand your reasoning, look and feel is always debatable.
Luckily KDE is pretty flexible to easily customize KDE with a few clicks to have any theme you want or install chrome, if you don’t like the default look and settings. To us though, none of the KDE default themes appear to be better in terms of useability (not look) than the current one (MS doesn’t do all things bad after all, so why not use parts of their default, like android copied similar look from Apple for a reason).
Anyway, we are going to come up with something netrunner-unique for 12.10. Since 12.04 will be Netrunner 4.2 (Dryland – Second Edition) we will very likely stick with it this cycle, then 12.10 will likely introduce different look and feel.
Well I read the comments of Edshyti. I agree with some of them. Since I am using KDE quite some time. What I dislike about Netrunner is
1) MS window type of look.
2) Firefox looks and specially why the google search (just below the search bar), is so big? Do you wan’na confuse someone by searching anything from there. Just see Mint-KDE/ any other KDE approach (which is also sponsored by you) of duck-duck go and its size.
3) It lags behind in terms of speed to Kubuntu.
4) Flash player is slow compared to Kubuntu and too slow if I compare it with Gnome distros.
Now the good points (but not good enough that I may start using it full time, but certainly in future and it looks promising)
1) Fresh looks (except where it tries to copy windows, specially buttons)
2) Nice wallpapers (that can be installed manually)
3) Yeh, stable
Now with Kubuntu and specially I would say Jonathan Riddell with you, Netrunner can take the KDE to a new heights.
Regards
[…] Package Management in Kubuntu is among the best among all Linux distributions. The Muon Software suite is used to handle it. It comes in three flavors: Muon Update Manager, Muon Software Center and Muon Package Manager. We’ve covered all three in-depth in our Visual Guide: Muon. […]